官方模拟版
一、实现
备注: 本部分基于 mini-vite 中的 CLI 的基础上实现
1.1 预构建入口
首先我们新建 src/node/optimizer/index.ts 来存放依赖预构建的逻辑:
export async function optimize(root: string) {
  // 1. 确定入口
  // 2. 从入口处扫描依赖
  // 3. 预构建依赖
}
然后在服务入口中引入预构建的逻辑:
// src/node/server/index.ts
import connect from "connect";
import { blue, green } from "picocolors";
+ import { optimize } from "../optimizer/index";

export async function startDevServer() {
  const app = connect();
  const root = process.cwd();
  const startTime = Date.now();
  app.listen(3000, async () => {
+   await optimize(root);

    console.log(
      green("🚀 No-Bundle 服务已经成功启动!"),
      `耗时: ${Date.now() - startTime}ms`
    );
    console.log(`> 本地访问路径: ${blue("http://localhost:3000")}`);
  });
}
接着我们来开发依赖预构建的功能,从上面的代码注释你也可以看出,我们需要完成三部分的逻辑:
-
确定预构建入口
-
从入口开始扫描出用到的依赖
-
对依赖进行预构建
1.2 确定预构建入口
首先是确定入口,为了方便理解,这里我直接约定为 src 目录下的 main.tsx 文件:
+import path from 'path';

export async function optimize(root: string) {
  +const entry = path.resolve(root, 'src/main.tsx');
}
同时, 在 test 目录新建 src/main.tsx 文件, 内容如下:
import App from './App';
import React from 'react';
import ReactDOM from 'react-dom';

ReactDOM.render(<App />, document.getElementById('root'));
在 test 目录新建 src/App.tsx 文件, 内容如下:
import React from "react";

function App(){
    return <div>Hello World</div>
}

export default App;
1.3 扫描预构建依赖
import path from 'path';
import { build } from 'esbuild';
import { green } from 'picocolors';
import { scanPlugin } from './scanPlugin';

export async function optimize(root: string) {
  const entry = path.resolve(root, 'src/main.tsx');
  const deps = new Set<string>();
  await build({
    entryPoints: [entry],
    bundle: true,
    write: false,
    plugins: [scanPlugin(deps)]
  });
  console.log(
    `${green('需要预构建的依赖')}:\n${[...deps]
      .map(green)
      .map(item => `  ${item}`)
      .join('\n')}`
  );
}
依赖扫描需要我们借助 Esbuild 插件来完成,最后会记录到 deps 这个集合中。接下来我们来着眼于 Esbuild 依赖扫描插件的开发,你需要在 optimizer 目录中新建 scanPlugin.ts 文件,内容如下:
// src/node/optimizer/scanPlugin.ts
import { Plugin } from "esbuild";
import { BARE_IMPORT_RE, EXTERNAL_TYPES } from "../constants";

export function scanPlugin(deps: Set<string>): Plugin {
  return {
    name: "esbuild:scan-deps",
    setup(build) {
      // 忽略的文件类型
      build.onResolve(
        { filter: new RegExp(`\\.(${EXTERNAL_TYPES.join("|")})$`) },
        (resolveInfo) => {
          return {
            path: resolveInfo.path,
            // 打上 external 标记
            external: true,
          };
        }
      );
      // 记录依赖
      build.onResolve(
        {
          filter: BARE_IMPORT_RE,
        },
        (resolveInfo) => {
          const { path: id } = resolveInfo;
          // 推入 deps 集合中
          deps.add(id);
          return {
            path: id,
            external: true,
          };
        }
      );
    },
  };
}
需要说明的是,文件中用到了一些常量,在 src/node/constants.ts 中定义,内容如下:
export const EXTERNAL_TYPES = [
  "css",
  "less",
  "sass",
  "scss",
  "styl",
  "stylus",
  "pcss",
  "postcss",
  "vue",
  "svelte",
  "marko",
  "astro",
  "png",
  "jpe?g",
  "gif",
  "svg",
  "ico",
  "webp",
  "avif",
];

export const BARE_IMPORT_RE = /^[\w@][^:]/;
插件的逻辑非常简单,即把一些无关的资源进行 external,不让 esbuild 处理,防止 Esbuild 报错,同时将bare import的路径视作第三方包,推入 deps 集合中。
现在,我们在 test 项目根路径中执行 pnpm dev,可以发现依赖扫描已经成功执行:

1.4 对依赖进行预构建
当我们收集到所有的依赖信息之后,就可以对每个依赖进行打包,完成依赖预构建了:
import path from 'path';
import { build } from 'esbuild';
import { green } from 'picocolors';
import { scanPlugin } from './scanPlugin';
import { PRE_BUNDLE_DIR } from '../constants';
import { preBundlePlugin } from './preBundlePlugin';

export async function optimize(root: string) {
  const entry = path.resolve(root, 'src/main.tsx');
  const deps = new Set<string>();
  await build({
    entryPoints: [entry],
    bundle: true,
    write: false,
    plugins: [scanPlugin(deps)]
  });
  console.log(
    `${green('需要预构建的依赖')}:\n${[...deps]
      .map(green)
      .map(item => `  ${item}`)
      .join('\n')}`
  );

  // 3. 预构建依赖
  await build({
    entryPoints: [...deps],
    write: true,
    bundle: true,
    format: 'esm',
    splitting: true,
    outdir: path.resolve(root, PRE_BUNDLE_DIR),
    plugins: [preBundlePlugin(deps)]
  });
}
在此,我们引入了一个新的常量 PRE_BUNDLE_DIR,定义如下:
// src/node/constants.ts
// 增加如下代码
import path from "path";

// 预构建产物默认存放在 node_modules 中的 .m-vite 目录中
export const PRE_BUNDLE_DIR = path.join("node_modules", ".m-vite");
接着,我们继续开发预构建的 Esbuild 插件。首先,考虑到兼容 Windows 系统,我们先加入一段工具函数的代码:
// src/node/utils.ts
import os from "os";

export function slash(p: string): string {
  return p.replace(/\\/g, "/");
}

export const isWindows = os.platform() === "win32";


export function normalizePath(id: string): string {
  return path.posix.normalize(isWindows ? slash(id) : id);
}
然后完善预构建 preBundlePlugin.ts 的代码:
import path from 'path';
import fs from 'fs-extra';
import resolve from 'resolve';
import createDebug from 'debug';
import { normalizePath } from '../utils';
import { Loader, Plugin } from 'esbuild';
import { BARE_IMPORT_RE } from '../constants';
import { init, parse } from 'es-module-lexer';

const debug = createDebug('dev');

export function preBundlePlugin(deps: Set<string>): Plugin {
  return {
    name: 'esbuild:pre-bundle',
    setup(build) {
      build.onResolve(
        {
          filter: BARE_IMPORT_RE
        },
        resolveInfo => {
          const { path: id, importer } = resolveInfo;
          const isEntry = !importer;
          if (deps.has(id)) {
            return isEntry
              ? {
                  path: id,
                  namespace: 'dep'
                }
              : {
                  path: resolve.sync(id, { basedir: process.cwd() })
                };
          }
        }
      );

      build.onLoad(
        {
          filter: /.*/,
          namespace: 'dep'
        },
        async loadInfo => {
          await init;
          const id = loadInfo.path;
          const root = process.cwd();
          const entryPath = normalizePath(resolve.sync(id, { basedir: root }));
          const code = await fs.readFile(entryPath, 'utf-8');
          const [imports, exports] = await parse(code);
          let proxyModule = [];
          if (!imports.length && !exports.length) {
            const res = require(entryPath);
            const specifiers = Object.keys(res);
            proxyModule.push(
              `export { ${specifiers.join(',')} } from "${entryPath}"`,
              `export default require("${entryPath}")`
            );
          } else {
            if (exports.includes('default')) {
              proxyModule.push(`import d from "${entryPath}";export default d`);
            }
            proxyModule.push(`export * from "${entryPath}"`);
          }
          debug('代理模块内容: %o', proxyModule.join('\n'));
          const loader = path.extname(entryPath).slice(1);
          return {
            loader: loader as Loader,
            contents: proxyModule.join('\n'),
            resolveDir: root
          };
        }
      );
    }
  };
}
值得一提的是,对于 CommonJS 格式的依赖,单纯用 export default require('入口路径') 是有局限性的,比如对于 React 而言,用这样的方式生成的产物最后只有 default 导出:
// esbuild 的打包产物
// 省略大部分代码
export default react_default;
那么用户在使用这个依赖的时候,必须这么使用:
// ✅ 正确
import React from 'react';

const { useState } = React;

// ❌ 报错
import { useState } from 'react';
那为什么上述会报错的语法在 Vite 是可以正常使用的呢?原因是 Vite 在做 import 语句分析的时候,自动将你的代码进行改写了:
// 原来的写法
import { useState } from 'react';

// Vite 的 importAnalysis 插件转换后的写法类似下面这样
import react_default from '/node_modules/.vite/react.js';

const { useState } = react_default;
那么,还有没有别的方案来解决这个问题?没错,上述的插件代码中已经用另一个方案解决了这个问题,我们不妨把目光集中在下面这段代码中:
 if (!imports.length && !exports.length) {
    // 构造代理模块
    // 通过 require 拿到模块的导出对象
    const res = require(entryPath);
    // 用 Object.keys 拿到所有的具名导出
    const specifiers = Object.keys(res);
    // 构造 export 语句交给 Esbuild 打包
    proxyModule.push(
      `export { ${specifiers.join(",")} } from "${entryPath}"`,
      `export default require("${entryPath}")`
    );
  }
如此一来,Esbuild 预构建的产物中便会包含 CommonJS 模块中所有的导出信息:
// 预构建产物导出代码
export {
  react_default as default,
  useState,
  useEffect,
  // 省略其它导出
}
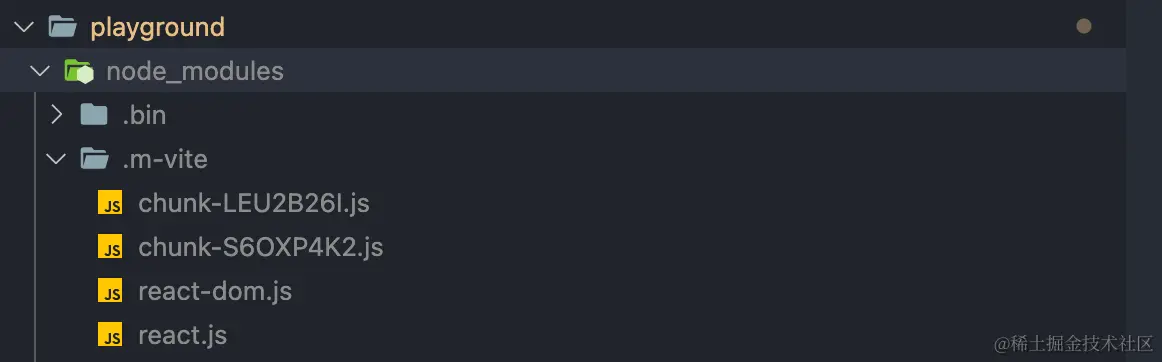
二、测试
OK,接下来让我们来测试一下预构建整体的功能。在 test 项目中执行 pnpm dev,接着去项目的 node_modules 目录中,可以发现新增了.m-vite 目录及react、react-dom的预构建产物: