认识
一、认识
二、工作流
-
获取模块的内容并解析模块
AST -
梳理模块间的依赖关系,生成一张模块依赖图(
ModuleGraph) -
根据模块依赖图生成拓扑排序后的模块列表,以保证最后的产物中各个模块的顺序是正确的,比如模块
A依赖了模块B,那么在产物中,模块B的代码需要保证在模块A的代码之前执行。 -
Tree Shaking的实现也是很重要的一环,基于import/export符号分析的Tree Shaking效果,保证只有被import的部分被打包进产物 -
输出完整的
Bundle代码,完成模块打包
三、获取模块信息
可以在src目录下新建rollup.ts,内容如下:
import fs from 'node:fs'
import { Bundle } from './bundle';
import { dirname } from 'node:path'

type Error = NodeJS.ErrnoException | null

export interface RollupOptions {
  input: string;
  output: string;
}


export function rollup(options: RollupOptions) {
  const { input = './index.js', output = './dist/index.js' } = options
  const bundle = new Bundle({
    entry: input
  });
  return bundle.build().then(() => {
    const generate = () => bundle.render()
    return {
      generate,
      write: async () => {
        const { code, map } = generate();
        if (!existsSync(dirname(output))) {
          await createDir(output)
        }
        return Promise.all([
          writeFile(output, code),
          writeFile(output + '.map', map.toString())
        ]);
      }
    };
  });
}
由此可见,所有核心的逻辑我们封装在了 Bundle 对象中,接着新建bundle.ts及其依赖的graph.ts, 添加如下的代码骨架:
import { Graph } from './graph';
import { Module } from './module';
import * as MagicString from 'magic-string';

interface BundleOptions {
  entry: string;
}

export class Bundle {
  graph: Graph;
  constructor(options: BundleOptions) {
    // 初始化模块依赖图对象
    this.graph = new Graph({
      entry: options.entry,
      bundle: this
    });
  }

  async build() {
    // 模块打包逻辑,完成所有的 AST 相关操作
    return this.graph.build();
  }

  render() {
    // 代码生成逻辑,拼接模块 AST 节点,产出代码
  }

  getModuleById(id: string) {
    return this.graph.getModuleById(id);
  }

  addModule(module: Module) {
    return this.graph.addModule(module);
  }
}
// 模块依赖图对象的实现
import { Module } from './module';
import { Bundle } from './bundle';
import { keys } from './utils/object';
import { dirname, resolve } from 'path';
import { ModuleLoader } from './moduleLoader';

export class Graph {
  entryPath: string;
  basedir: string;
  moduleById: Record<string, Module> = {};
  modules: Module[] = [];

  constructor(options: GraphOptions) {
    const { entry, bundle } = options;
    this.entryPath = resolve(entry);
    this.basedir = dirname(this.entryPath);
    this.bundle = bundle;
  }

  async build() {
    // 1. 获取并解析模块信息
    // 2. 构建依赖关系图
    // 3. 模块拓扑排序
    // 4. Tree Shaking, 标记需要包含的语句
  }

  getModuleById(id: string) {
    return this.moduleById[id];
  }

  addModule(module: Module) {
    if (!this.moduleById[module.id]) {
      this.moduleById[module.id] = module;
      this.modules.push(module);
    }
  }
}
四、模块 AST 解析
我们基于目前的 graph.ts 继续开发,首先在 Graph 对象中初始化模块加载器(ModuleLoader):
export class Graph {
  constructor(options: GraphOptions) {
    // 省略其它代码
    // 初始化模块加载器对象
    this.moduleLoader = new ModuleLoader(bundle);
  }

  async build() {
    // 1. 获取并解析模块信息,返回入口模块对象
    const entryModule = await this.moduleLoader.fetchModule(
      this.entryPath,
      null,
      true
    );
  }
}
然后添加 moduleLoader.ts,代码如下:
export class ModuleLoader {
  bundle: Bundle;
  resolveIdsMap: Map<string, string | false> = new Map();
  constructor(bundle: Bundle) {
    this.bundle = bundle;
  }

  // 解析模块逻辑
  resolveId(id: string, importer: string | null) {
    const cacheKey = id + importer;
    if (this.resolveIdsMap.has(cacheKey)) {
      return this.resolveIdsMap.get(cacheKey)!;
    }
    const resolved = defaultResolver(id, importer);
    this.resolveIdsMap.set(cacheKey, resolved);
    return resolved;
  }

  // 加载模块内容并解析
  async fetchModule(
    id: string,
    importer: null | string,
    isEntry = false,
    bundle: Bundle = this.bundle,
    loader: ModuleLoader = this
  ): Promise<Module | null> {
    const path = this.resolveId(id, importer);
    // 查找缓存
    const existModule = this.bundle.getModuleById(path);
    if (existModule) {
      return existModule;
    }
    const code = await readFile(path, { encoding: 'utf-8' });
    // 初始化模块,解析 AST
    const module = new Module({
      path,
      code,
      bundle,
      loader,
      isEntry
    });
    this.bundle.addModule(module);
    // 拉取所有的依赖模块
    await this.fetchAllDependencies(module);
    return module;
  }

  async fetchAllDependencies(module: Module) {
    await Promise.all(
      module.dependencies.map((dep) => {
        return this.fetchModule(dep, module.path);
      })
    );
  }
}
主要由 fetchModule 方法完成模块的加载和解析,流程如下:
-
调用
resolveId方法解析模块路径 -
初始化模块实例即
Module对象,解析模块AST -
递归初始化模块的所有依赖模块
其中,最主要的逻辑在于第二步,即 Module 对象实例的初始化,在这个过程中,模块代码将会被进行 AST 解析及依赖分析。接下来,让我们把目光集中在 Module 对象的实现上。
export class Module {
  isEntry: boolean = false;
  id: string;
  path: string;
  bundle: Bundle;
  moduleLoader: ModuleLoader;
  code: string;
  magicString: MagicString;
  statements: Statement[];
  imports: Imports;
  exports: Exports;
  reexports: Exports;
  exportAllSources: string[] = [];
  exportAllModules: Module[] = [];
  dependencies: string[] = [];
  dependencyModules: Module[] = [];
  referencedModules: Module[] = [];
  constructor({ path, bundle, code, loader, isEntry = false }: ModuleOptions) {
    this.id = path;
    this.bundle = bundle;
    this.moduleLoader = loader;
    this.isEntry = isEntry;
    this.path = path;
    this.code = code;
    this.magicString = new MagicString(code);
    this.imports = {};
    this.exports = {};
    this.reexports = {};
    this.declarations = {};
    try {
      const ast = parse(code) as any;
      const nodes = ast.body as StatementNode[];
      // 以语句(Statement)的维度来拆分 Module,保存 statement 的集合,供之后分析
      this.statements = nodes.map((node) => {
        const magicString = this.magicString.snip(node.start, node.end);
        // Statement 对象将在后文中介绍具体实现
        return new Statement(node, magicString, this);
      });
    } catch (e) {
      console.log(e);
      throw e;
    }
    // 分析 AST 节点
    this.analyseAST();
  }
  analyseAST() {
    // 以语句为最小单元来分析
    this.statements.forEach((statement) => {
      // 对 statement 进行分析
      statement.analyse();
      // 注册顶层声明
      if (!statement.scope.parent) {
        statement.scope.eachDeclaration((name, declaration) => {
          this.declarations[name] = declaration;
        });
      }
    });
    // 注册 statement 的 next 属性,用于生成代码使用,next 即下一个 statement 的起始位置
    const statements = this.statements;
    let next = this.code.length;
    for (let i = statements.length - 1; i >= 0; i--) {
      statements[i].next = next;
      next = statements[i].start;
    }
  }
}
我们可以来梳理一下解析 AST 节点主要做了哪些事情:
-
调用
ast-parser将代码字符串解析为AST对象 -
遍历
AST对象中的各个语句,以语句的维度来进行AST分析,通过语句的分析结果来构造作用域链和模块依赖关系
接下来我们将重点放到 Statement 对象的实现上。你可以新建 src/statement.ts,内容如下:
// 以下为三个工具函数
// 是否为函数节点
function isFunctionDeclaration(node: Declaration): boolean {
  if (!node) return false;
  return (
    // function foo() {}
    node.type === 'FunctionDeclaration' ||
    // const foo = function() {}
    (node.type === NodeType.VariableDeclarator &&
      node.init &&
      node.init.type === NodeType.FunctionExpression) ||
    // export function ...
    // export default function
    ((node.type === NodeType.ExportNamedDeclaration ||
      node.type === NodeType.ExportDefaultDeclaration) &&
      !!node.declaration &&
      node.declaration.type === NodeType.FunctionDeclaration)
  );
}

// 是否为 export 声明节点
export function isExportDeclaration(node: ExportDeclaration): boolean {
  return /^Export/.test(node.type);
}

// 是否为 import 声明节点
export function isImportDeclaration(node: any) {
  return node.type === 'ImportDeclaration';
}

export class Statement {
  node: StatementNode;
  magicString: MagicString;
  module: Module;
  scope: Scope;
  start: number;
  next: number;
  isImportDeclaration: boolean;
  isExportDeclaration: boolean;
  isReexportDeclaration: boolean;
  isFunctionDeclaration: boolean;
  isIncluded: boolean = false;
  defines: Set<string> = new Set();
  modifies: Set<string> = new Set();
  dependsOn: Set<string> = new Set();
  references: Reference[] = [];
  constructor(node: StatementNode, magicString: MagicString, module: Module) {
    this.magicString = magicString;
    this.node = node;
    this.module = module;
    this.scope = new Scope({
      statement: this
    });
    this.start = node.start;
    this.next = 0;
    this.isImportDeclaration = isImportDeclaration(node);
    this.isExportDeclaration = isExportDeclaration(node as ExportDeclaration);
    this.isReexportDeclaration =
      this.isExportDeclaration &&
      !!(node as ExportAllDeclaration | ExportNamedDeclaration).source;
    this.isFunctionDeclaration = isFunctionDeclaration(
      node as FunctionDeclaration
    );

  }

  analyse() {
    if (this.isImportDeclaration) return;
    // 1、构建作用域链,记录 Declaration 节点表
    buildScope(this);
    // 2. 寻找引用的依赖节点,记录 Reference 节点表
    findReference(this);
  }
}
在 Statement 节点的分析过程中主要需要做两件事情:
-
构建作用域链。这是为了记录当前语句中声明的变量
-
记录引用的依赖节点。这是为了记录当前语句引用了哪些变量以及这些变量对应的
AST节点
而无论是构建作用域链还是记录引用节点,我们都离不开一个最基本的操作,那就是对 AST 进行遍历操作。你可以新建src/utils/walk.ts,用来存放 AST 节点遍历的逻辑
let shouldSkip;
let shouldAbort: boolean;

export function walk(ast: any, { enter, leave }: { enter: any; leave: any }) {
  shouldAbort = false;
  visit(ast, null, enter, leave);
}

let context = {
  skip: () => (shouldSkip = true),
  abort: () => (shouldAbort = true)
};

let childKeys = {} as Record<string, string[]>;

let toString = Object.prototype.toString;

function isArray(thing: Object) {
  return toString.call(thing) === '[object Array]';
}

function visit(node: any, parent: any, enter: any, leave: any, prop?: string) {
  if (!node || shouldAbort) return;

  if (enter) {
    shouldSkip = false;
    enter.call(context, node, parent, prop);
    if (shouldSkip || shouldAbort) return;
  }

  let keys =
    childKeys[node.type] ||
    (childKeys[node.type] = Object.keys(node).filter(
      (key) => typeof node[key] === 'object'
    ));

  let key, value;

  for (let i = 0; i < keys.length; i++) {
    key = keys[i];
    value = node[key];

    if (isArray(value)) {
      for (let j = 0; j < value.length; j++) {
        visit(value[j], node, enter, leave, key);
      }
    } else if (value && value.type) {
      visit(value, node, enter, leave, key);
    }
  }

  if (leave && !shouldAbort) {
    leave(node, parent, prop);
  }
}
接下来我们主要通过这个遍历器来完成 Statement 节点的分析。对于作用域链的分析,我们先来新建一个 Scope 对象,封装作用域相关的基本信息:
import { Statement } from 'Statement';
import { Declaration } from 'ast/Declaration';

interface ScopeOptions {
  parent?: Scope;
  paramNodes?: any[];
  block?: boolean;
  statement: Statement;
  isTopLevel?: boolean;
}

export class Scope {
  // 父作用域
  parent?: Scope;
  // 如果是函数作用域,则需要参数节点
  paramNodes: any[];
  // 是否为块级作用域
  isBlockScope?: boolean;
  // 作用域对应的语句节点
  statement: Statement;
  // 变量/函数 声明节点,为 Scope 的核心数据
  declarations: Record<string, Declaration> = {};
  constructor(options: ScopeOptions) {
    const { parent, paramNodes, block, statement } = options;
    this.parent = parent;
    this.paramNodes = paramNodes || [];
    this.statement = statement;
    this.isBlockScope = !!block;
    this.paramNodes.forEach(
      (node) =>
        (this.declarations[node.name] = new Declaration(
          node,
          true,
          this.statement
        ))
    );
  }

  addDeclaration(node: any, isBlockDeclaration: boolean) {
    // block scope & var, 向上追溯,直到顶层作用域
    if (this.isBlockScope && !isBlockDeclaration && this.parent) {
      this.parent.addDeclaration(node, isBlockDeclaration);
    } else {
      // 否则在当前作用域新建声明节点(Declaration)
      const key = node.id && node.id.name;
      this.declarations[key] = new Declaration(node, false, this.statement);
    }
  }

  // 遍历声明节点(Declaration)
  eachDeclaration(fn: (name: string, dec: Declaration) => void) {
    Object.keys(this.declarations).forEach((key) => {
      fn(key, this.declarations[key]);
    });
  }

  contains(name: string): Declaration {
    return this.findDeclaration(name);
  }

  findDeclaration(name: string): Declaration {
    return (
      this.declarations[name] ||
      (this.parent && this.parent.findDeclaration(name))
    );
  }
}
Scope 的核心在于声明节点(即Declaration)的收集与存储,而上述的代码中并没有 Declaration 对象的实现,接下来我们来封装一下这个对象:
import { Module } from '../module';
import { Statement } from '..sStatement';
import { Reference } from './reference';

export class Declaration {
  isFunctionDeclaration: boolean = false;
  functionNode: any;
  statement: Statement | null;
  name: string | null = null;
  isParam: boolean = false;
  isUsed: boolean = false;
  isReassigned: boolean = false;
  constructor(node: any, isParam: boolean, statement: Statement | null) {
    // 考虑函数和变量声明两种情况
    if (node) {
      if (node.type === 'FunctionDeclaration') {
        this.isFunctionDeclaration = true;
        this.functionNode = node;
      } else if (
        node.type === 'VariableDeclarator' &&
        node.init &&
        /FunctionExpression/.test(node.init.type)
      ) {
        this.isFunctionDeclaration = true;
        this.functionNode = node.init;
      }
    }
    this.statement = statement;
    this.isParam = isParam;
  }

  addReference(reference: Reference) {
    reference.declaration = this;
    this.name = reference.name;
  }
}
既然有了声明节点,那么我们如果感知到哪些地方使用了这些节点呢?这时候就需要 Reference 节点登场了,它的作用就是记录其它节点与 Declaration 节点的引用关系,让我门来简单实现一下:
import { Scope } from './scope';
import { Statement } from '../statement';
import { Declaration } from './declaration';

export class Reference {
  node: any;
  scope: Scope;
  statement: Statement;
  // declaration 信息在构建依赖图的部分补充
  declaration: Declaration | null = null;
  name: string;
  start: number;
  end: number;
  objectPaths: any[] = [];
  constructor(node: any, scope: Scope, statement: Statement) {
    this.node = node;
    this.scope = scope;
    this.statement = statement;
    this.start = node.start;
    this.end = node.end;
    let root = node;
    this.objectPaths = [];
    while (root.type === 'MemberExpression') {
      this.objectPaths.unshift(root.property);
      root = root.object;
    }
    this.objectPaths.unshift(root);
    this.name = root.name;
  }
}
OK,前面铺垫了这么多基础的数据结构,让大家了解到各个关键对象的作用及其联系,接下来我们正式开始编写构建作用域链的代码。你可以新建src/utils/buildScope.ts,内容如下:
import { walk } from 'utils/walk';
import { Scope } from 'ast/Scope';
import { Statement } from 'Statement';
import {
  NodeType,
  Node,
  VariableDeclaration,
  VariableDeclarator
} from 'ast-parser';
import { FunctionDeclaration } from 'ast-parser';

export function buildScope(statement: Statement) {
  const { node, scope: initialScope } = statement;
  let scope = initialScope;
  // 遍历 AST
  walk(node, {
    // 遵循深度优先的原则,每进入和离开一个节点会触发 enter 和 leave 钩子
    // 如 a 的子节点为 b,那么触发顺序为 a-enter、b-enter、b-leave、a-leave
    enter(node: Node) {
      // function foo () {...}
      if (node.type === NodeType.FunctionDeclaration) {
        scope.addDeclaration(node, false);
      }
      // var let const
      if (node.type === NodeType.VariableDeclaration) {
        const currentNode = node as VariableDeclaration;
        const isBlockDeclaration = currentNode.kind !== 'var';
        currentNode.declarations.forEach((declarator: VariableDeclarator) => {
          scope.addDeclaration(declarator, isBlockDeclaration);
        });
      }

      let newScope;

      // function scope
      if (node.type === NodeType.FunctionDeclaration) {
        const currentNode = node as FunctionDeclaration;
        newScope = new Scope({
          parent: scope,
          block: false,
          paramNodes: currentNode.params,
          statement
        });
      }

      // new block scope
      if (node.type === NodeType.BlockStatement) {
        newScope = new Scope({
          parent: scope,
          block: true,
          statement
        });
      }
      // 记录 Scope 父子关系
      if (newScope) {
        Object.defineProperty(node, '_scope', {
          value: newScope,
          configurable: true
        });

        scope = newScope;
      }
    },
    leave(node: any) {
      // 更新当前作用域
      // 当前 scope 即 node._scope
      if (node._scope && scope.parent) {
        scope = scope.parent;
      }
    }
  });
}
从中可以看到,我们会对如下类型的 AST 节点进行处理:
-
变量声明节点。包括
var、let和const声明对应的节点。对let和const,我们需要将声明节点绑定到当前作用域中,而对于var,需要绑定到全局作用域 -
函数声明节点。对于这类节点,我们直接创建一个新的作用域
-
块级节点。即用
{}包裹的节点,如if块、函数体,此时我们也创建新的作用域
在构建完作用域完成后,我们进入下一个环节: 记录引用节点
新建src/utils/findReference.ts,内容如下:
import { Statement } from 'Statement';
import { walk } from 'utils/walk';
import { Reference } from 'ast/Reference';

function isReference(node: any, parent: any): boolean {
  if (node.type === 'MemberExpression' && parent.type !== 'MemberExpression') {
    return true;
  }
  if (node.type === 'Identifier') {
    // 如 export { foo as bar }, 忽略 bar
    if (parent.type === 'ExportSpecifier' && node !== parent.local)
      return false;
    // 如 import { foo as bar } from 'xxx', 忽略 bar
    if (parent.type === 'ImportSpecifier' && node !== parent.imported) {
      return false;
    }
    return true;
  }
  return false;
}

export function findReference(statement: Statement) {
  const { references, scope: initialScope, node } = statement;
  let scope = initialScope;
  walk(node, {
    enter(node: any, parent: any) {
      if (node._scope) scope = node._scope;
      if (isReference(node, parent)) {
        // 记录 Reference 节点
        const reference = new Reference(node, scope, statement);
        references.push(reference);
      }
    },
    leave(node: any) {
      if (node._scope && scope.parent) {
        scope = scope.parent;
      }
    }
  });
}
至此,我们就完成了模块 AST 解析的功能。
五、构建模块依赖图
回到 Graph 对象中,接下来我们需要实现的是模块依赖图的构建:
// src/graph.ts
export class Graph {
  async build() {
    //  ✅(完成) 1. 获取并解析模块信息
    // 2. 构建依赖关系图
    this.module.forEach(module => module.bind());
    // 3. 模块拓扑排序
    // 4. Tree Shaking, 标记需要包含的语句
  }
}
现在我们在 Module 对象的 AnalyzeAST 中新增依赖绑定的代码:
// src/Module.ts
analyzeAST() {
  // 如果语句为 import/export 声明,那么给当前模块记录依赖的标识符
  this.statements.forEach((statement) => {
    if (statement.isImportDeclaration) {
      this.addImports(statement);
    } else if (statement.isExportDeclaration) {
      this.addExports(statement);
    }
  });
}

// 处理 import 声明
addImports(statement: Statement) {
  const node = statement.node as any;
  const source = node.source.value;
  // import
  node.specifiers.forEach((specifier: Specifier) => {
    // 为方便理解,本文只处理具名导入
    const localName = specifier.local.name;
    const name = specifier.imported.name;
    this.imports[localName] = { source, name, localName };
  });
  this._addDependencySource(source);
}

// 处理 export 声明
addExports(statement: Statement) {
  const node = statement.node as any;
  const source = node.source && node.source.value;
  // 为方便立即,本文只处理具名导出
  if (node.type === 'ExportNamedDeclaration') {
    // export { a, b } from 'mod'
    if (node.specifiers.length) {
      node.specifiers.forEach((specifier: Specifier) => {
        const localName = specifier.local.name;
        const exportedName = specifier.exported.name;
        this.exports[exportedName] = {
          localName,
          name: exportedName
        };
        if (source) {
          this.reexports[localName] = {
            statement,
            source,
            localName,
            name: localName,
            module: undefined
          };
          this.imports[localName] = {
            source,
            localName,
            name: localName
          };
          this._addDependencySource(source);
        }
      });
    } else {
      const declaration = node.declaration;
      let name;
      if (declaration.type === 'VariableDeclaration') {
        // export const foo = 2;
        name = declaration.declarations[0].id.name;
      } else {
        // export function foo() {}
        name = declaration.id.name;
      }
      this.exports[name] = {
        statement,
        localName: name,
        name
      };
    }
  } else if (node.type === 'ExportAllDeclaration') {
    // export * from 'mod'
    if (source) {
      this.exportAllSources.push(source);
      this.addDependencySource(source);
    }
  }
}

private _addDependencySource(source: string) {
  if (!this.dependencies.includes(source)) {
    this.dependencies.push(source);
  }
}
在记录完 import 和 export 的标识符之后,我们根据这些标识符绑定到具体的模块对象,新增bind方法,实现如下:
bind() {
  // 省略已有代码
  // 记录标识符对应的模块对象
  this.bindDependencies();
  /// 除此之外,根据之前记录的 Reference 节点绑定对应的 Declaration 节点
  this.bindReferences();
}

bindDependencies() {
  [...Object.values(this.imports), ...Object.values(this.reexports)].forEach(
    (specifier) => {
      specifier.module = this._getModuleBySource(specifier.source!);
    }
  );
  this.exportAllModules = this.exportAllSources.map(
    this._getModuleBySource.bind(this)
  );
  // 建立模块依赖图
  this.dependencyModules = this.dependencies.map(
    this._getModuleBySource.bind(this)
  );
  this.dependencyModules.forEach((module) => {
    module.referencedModules.push(this);
  });
}

bindReferences() {
  this.statements.forEach((statement) => {
    statement.references.forEach((reference) => {
      // 根据引用寻找声明的位置
      // 寻找顺序: 1. statement 2. 当前模块 3. 依赖模块
      const declaration =
        reference.scope.findDeclaration(reference.name) ||
        this.trace(reference.name);
      if (declaration) {
        declaration.addReference(reference);
      }
    });
  });
}

private _getModuleBySource(source: string) {
  const id = this.moduleLoader.resolveId(source!, this.path) as string;
  return this.bundle.getModuleById(id);
}
现在,我们便将各个模块间的依赖关系绑定完成了。
六、模块拓扑排序
接下来,我们将所有的模块根据依赖关系进行拓扑排序:
// src/graph.ts
export class Graph {
  async build() {
    //  ✅(完成) 1. 获取并解析模块信息
    //  ✅(完成) 2. 构建依赖关系图
    // 3. 模块拓扑排序
    this.orderedModules = this.sortModules(entryModule!);
    // 4. Tree Shaking, 标记需要包含的语句
  }

  sortModules(entryModule: Module) {
    // 拓扑排序模块数组
    const orderedModules: Module[] = [];
    // 记录已经分析过的模块表
    const analysedModule: Record<string, boolean> = {};
    // 记录模块的父模块 id
    const parent: Record<string, string> = {};
    // 记录循环依赖
    const cyclePathList: string[][] = [];

    // 用来回溯,用来定位循环依赖
    function getCyclePath(id: string, parentId: string): string[] {
      const paths = [id];
      let currrentId = parentId;
      while (currrentId !== id) {
        paths.push(currrentId);
        // 向前回溯
        currrentId = parent[currrentId];
      }
      paths.push(paths[0]);
      return paths.reverse();
    }

    // 拓扑排序核心逻辑,基于依赖图的后序遍历完成
    function analyseModule(module: Module) {
      if (analysedModule[module.id]) {
        return;
      }
      for (const dependency of module.dependencyModules) {
        // 检测循环依赖
        // 为什么是这个条件,下文会分析
        if (parent[dependency.id]) {
          if (!analysedModule[dependency.id]) {
            cyclePathList.push(getCyclePath(dependency.id, module.id));
          }
          continue;
        }
        parent[dependency.id] = module.id;
        analyseModule(dependency);
      }
      analysedModule[module.id] = true;
      orderedModules.push(module);
    }
    // 从入口模块开始分析
    analyseModule(entryModule);
    // 如果有循环依赖,则打印循环依赖信息
    if (cyclePathList.length) {
      cyclePathList.forEach((paths) => {
        console.log(paths);
      });
      process.exit(1);
    }
    return orderedModules;
  }
}
拓扑排序的核心在于对依赖图进行后续遍历,将被依赖的模块放到前面,如下图所示:
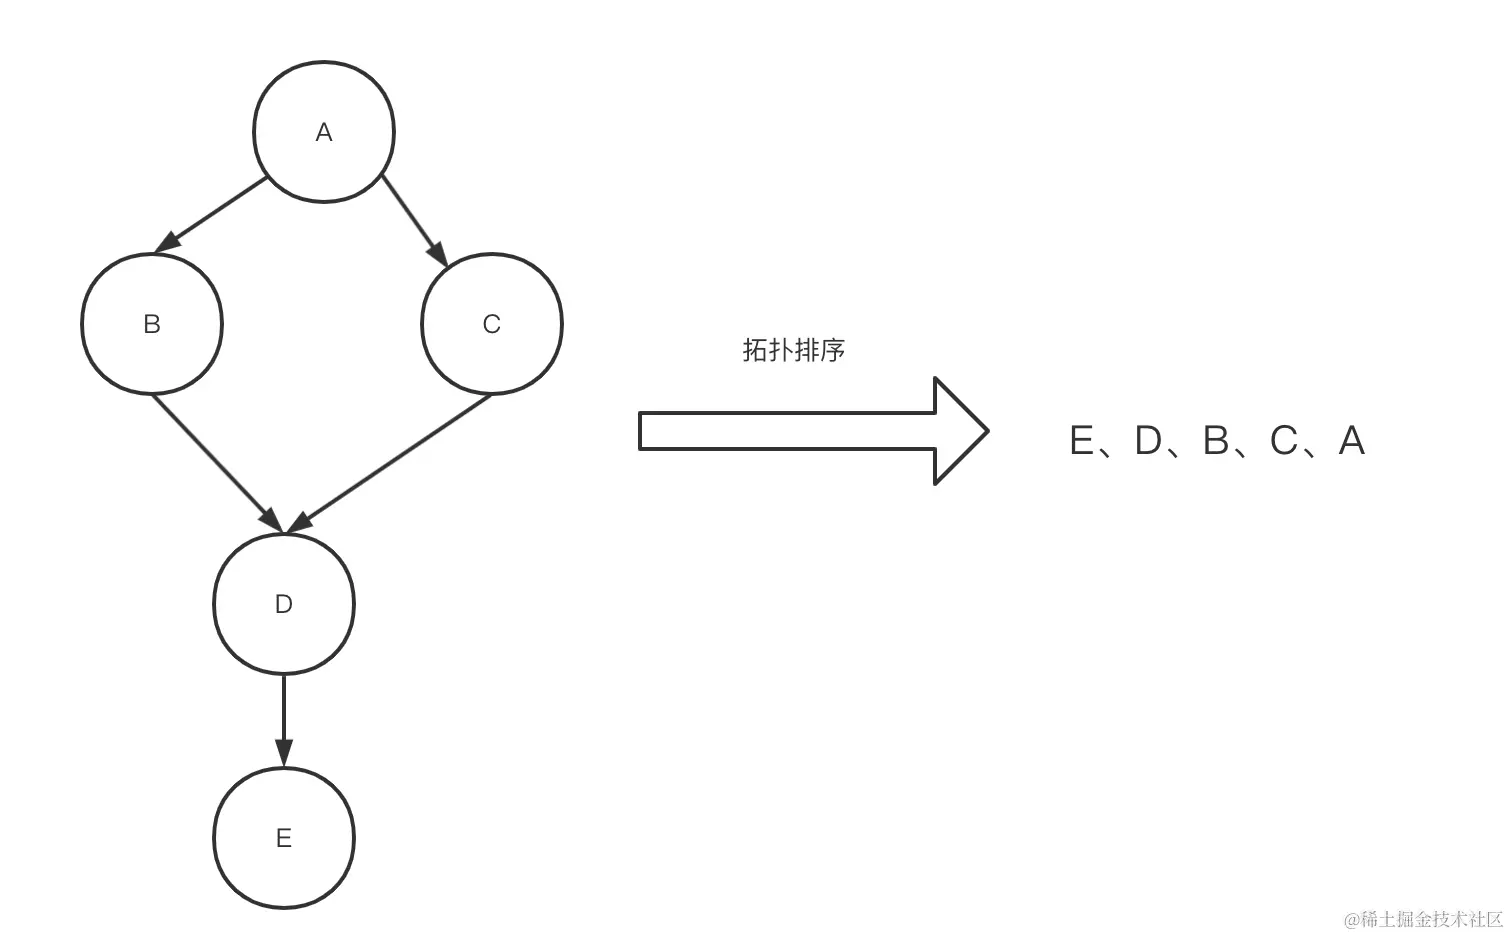
其中 A 依赖 B 和 C,B 和 C 依赖 D,D 依赖 E,那么最后的拓扑排序即E、D、B、C、A。但也有一种特殊情况,就是出现循环的情况,如下面这张图所示:
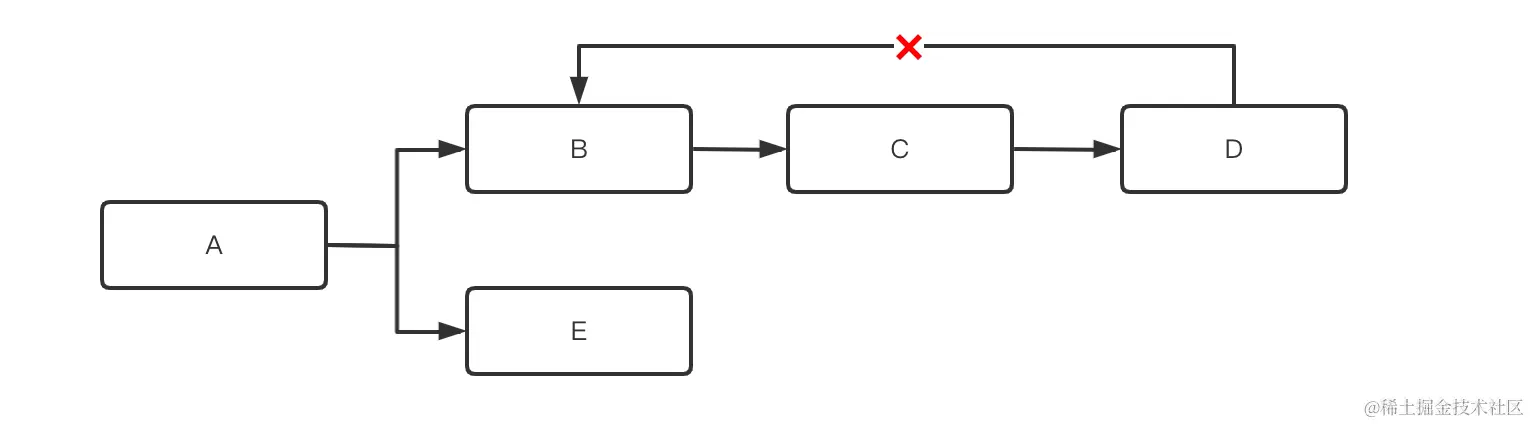
上图中的依赖关系呈现了B->C->D->B的循环依赖,这种情况是我们需要避免的。那么如何来检测出循环依赖呢?
由于 analyseModule 函数中采用后序的方式来遍历依赖,也就是说一旦某个模块被记录到 analysedModule 表中,那么也就意味着其所有的依赖模块已经被遍历完成了:
function analyseModule(module: Module) {
  if (analysedModule[module.id]) {
    return;
  }
  for (const dependency of module.dependencyModules) {
    // 检测循环依赖的代码省略
    parent[dependency.id] = module.id;
    analyseModule(dependency);
  }
  analysedModule[module.id] = true;
  orderedModules.push(module);
}
如果某个模块没有被记录到 analysedModule 中,则表示它的依赖模块并没有分析完,在这个前提下中,如果再次遍历到这个模块,说明已经出现了循环依赖,你可以对照下图理解:

因此检测循环依赖的条件应该为下面这样:
for (const dependency of module.dependencyModules) {
  // 检测循环依赖
  // 1. 不为入口模块
  if (parent[dependency.id]) {
    // 2. 依赖模块还没有分析结束
    if (!analysedModule[dependency.id]) {
      cyclePathList.push(getCyclePath(dependency.id, module.id));
    }
    continue;
  }
  parent[dependency.id] = module.id;
  analyseModule(dependency);
}
七、Tree Shaking
OK,到目前为止,我们完成了第三步模块拓扑排序的步骤,接下来我们进入 Tree Shaking 功能的开发:
// src/Graph.ts
export class Graph {
  async build() {
    // ✅(完成) 1. 获取并解析模块信息
    // ✅(完成) 2. 构建依赖关系图
    // ✅(完成) 3. 模块拓扑排序
    // 4. Tree Shaking, 标记需要包含的语句
  }
}
相信 Tree Shaking 对于大家并不陌生,它主要的作用就是在打包产物中摇掉没有使用的代码,从而优化产物体积。而得益于 ES 模块的静态特性,我们可以基于 import/export 的符号可达性来进行 Tree Shaking 分析,如:
// index.ts
import { a } from './utils';

console.log(a);

// utils.ts
export const a = 1;

export const b = 2;
由于在如上的代码中我们只使用到了 a,则 a 属于可达符号,b 属于不可达符号,因此最后的代码不会包含 b 相关的实现代码。
接下来我们就来实现这一功能,即基于符号可达性来进行无用代码的删除。
// src/Graph.ts
export class Graph {
  async build() {
    // ✅(完成) 1. 获取并解析模块信息
    // ✅(完成) 2. 构建依赖关系图
    // ✅(完成) 3. 模块拓扑排序
    // 4. Tree Shaking, 标记需要包含的语句
    // 从入口处分析
    entryModule!.getExports().forEach((name) => {
      const declaration = entryModule!.traceExport(name);
      declaration!.use();
    });
  }
}
在 Module 对象中,我们需要增加getExports和traceExport方法来获取和分析模块的导出:
// 拿到模块所有导出
getExports(): string[] {
  return [
    ...Object.keys(this.exports),
    ...Object.keys(this.reexports),
    ...this.exportAllModules
      .map(module => module.getExports())
      .flat()
    ];
}

// 从导出名追溯到 Declaration 声明节点
traceExport(name: string): Declaration | null {
  // 1. reexport
  // export { foo as bar } from './mod'
  const reexportDeclaration = this.reexports[name];
  if (reexportDeclaration) {
    // 说明是从其它模块 reexport 出来的
    // 经过 bindDependencies 方法处理,现已绑定 module
    const declaration = reexportDeclaration.module!.traceExport(
      reexportDeclaration.localName
    );
    if (!declaration) {
      throw new Error(
        `${reexportDeclaration.localName} is not exported by module ${
          reexportDeclaration.module!.path
        }(imported by ${this.path})`
      );
    }
    return declaration;
  }
  // 2. export
  // export { foo }
  const exportDeclaration = this.exports[name];
  if (exportDeclaration) {
    const declaration = this.trace(name);
    if (declaration) {
      return declaration;
    }
  }
  // 3. export all
  for (let exportAllModule of this.exportAllModules) {
    const declaration = exportAllModule.trace(name);
    if (declaration) {
      return declaration;
    }
  }
  return null;
}

trace(name: string) {
  if (this.declarations[name]) {
    // 从当前模块找
    return this.declarations[name];
  }
  // 从依赖模块找
  if (this.imports[name]) {
    const importSpecifier = this.imports[name];
    const importModule = importSpecifier.module!;
    const declaration = importModule.traceExport(importSpecifier.name);
    if (declaration) {
      return declaration;
    }
  }
  return null;
}
当我们对每个导出找到对应的 Declaration 节点之后,则对这个节点进行标记,从而让其代码能够在代码生成阶段得以保留。那么如何进行标记呢?
我们不妨回到 Declaration 的实现中,增加 use 方法:
use() {
  // 标记该节点被使用
  this.isUsed = true;
  // 对应的 statement 节点也应该被标记
  if (this.statement) {
    this.statement.mark();
  }
}

// 另外,你可以加上 render 方法,便于后续代码生成的步骤
render() {
  return this.name;
}
接下来我们到 Statement 对象中,继续增加 mark 方法,来追溯被使用过的 Declaration 节点:
// src/Statement.ts
mark() {
  if (this.isIncluded) {
    return;
  }
  this.isIncluded = true;
  this.references.forEach(
    (ref: Reference) => ref.declaration && ref.declaration.use()
  );
}
这时候,Reference 节点的作用就体现出来了,由于我们之前专门收集到 Statement 的 Reference 节点,通过 Reference 节点我们可以追溯到对应的 Declaration 节点,并调用其 use 方法进行标记。
八、生成 Bundle 代码
我们在 Module 对象中增加 render 方法,用来将模块渲染为字符串:
render() {
  const source = this.magicString.clone().trim();
  this.statements.forEach((statement) => {
    // 1. Tree Shaking
    if (!statement.isIncluded) {
      source.remove(statement.start, statement.next);
      return;
    }
    // 2. 重写引用位置的变量名 -> 对应的声明位置的变量名
    statement.references.forEach((reference) => {
      const { start, end } = reference;
      const declaration = reference.declaration;
      if (declaration) {
        const name = declaration.render();
        source.overwrite(start, end, name!);
      }
    });
    // 3. 擦除/重写 export 相关的代码
    if (statement.isExportDeclaration && !this.isEntry) {
      // export { foo, bar }
      if (
        statement.node.type === 'ExportNamedDeclaration' &&
        statement.node.specifiers.length
      ) {
        source.remove(statement.start, statement.next);
      }
      // remove `export` from `export const foo = 42`
      else if (
        statement.node.type === 'ExportNamedDeclaration' &&
        (statement.node.declaration!.type === 'VariableDeclaration' ||
          statement.node.declaration!.type === 'FunctionDeclaration')
      ) {
        source.remove(
          statement.node.start,
          statement.node.declaration!.start
        );
      }
      // remove `export * from './mod'`
      else if (statement.node.type === 'ExportAllDeclaration') {
        source.remove(statement.start, statement.next);
      }
    }
  });
  return source.trim();
}
接着,我们在 Bundle 对象也实现一下 render 方法,用来生成最后的产物代码:
render(): { code: string } {
  let msBundle = new MagicString.Bundle({ separator: '\n' });
  // 按照模块拓扑顺序生成代码
  this.graph.orderedModules.forEach((module) => {
    msBundle.addSource({
      content: module.render()
    });
  });

  return {
    code: msBundle.toString(),
  };
}